Synclogic Signup Walkthrough
PC SYNCLOGIC INSTRUCTIONS
In order to connect to our shop directly (to have products sync directly into your Shopify store) please follow the instructions step by step.
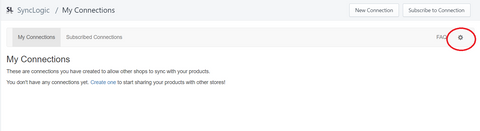
2. Go into Synclogic and click on Settings (this is the little cog wheel in the upper
right-hand corner right next to the FAQ button.)
3. Make sure that the box is checked next to “Sync all fields when Synclogic creates new products.”

4. Scroll down and disable the setting "Allow purchases when out of stock (setting)". Also, confirm that "Inventory Tracking" and "Inventory Quantities" are set to sync.

NOTE: These are the most important settings for a smooth drop shipping experience. However, you have complete control over the other settings. We feel it is much easier to bring in all the data and then pare it down. This set up will bring in all the product information initially, then only fields set to Sync will continue to update regularly. If you plan to change pricing, tags, product descriptions, pictures, etc., then be sure to disable the sync for items you may want to change. If you do not disable the sync for a field and start to edit it in a product it will revert back to the original data from our system causing you to lose your changes. You can always change your setting in the future. These settings also impact all drop shippers you use so if another drop shipper has different instructions please understand these are global settings and will impact all of your connections.
5. Scroll down to the bottom of the Settings page and click the blue save button.

6. Click “Subscribe to Connection” in the upper right-hand corner.

7. Enter the connection code 7048KTZ0 for the entire inventory or
P17T41KO for graphic ts only

8. Under “Matching Strategy”, click “match products with handle on accepted connection.

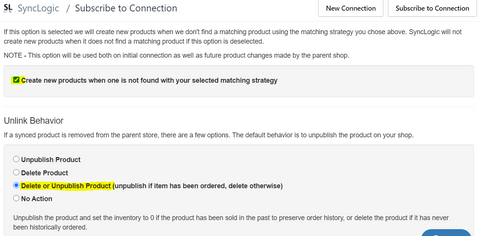
9. Under “Create Products” , mark the check box new to “Create new products when one is not found with your selected matching strategy”

10. Under “Unlink Behavior” mark “Delete or Unpublish”
11. Next to “Price Transformations”, click on the blue “optional” button.
12. Scroll all the way down. Under the heading “Price Transformation”, Decide what your mark up will be. In the picture you see we have in 200 that will double the wholesale price. For a 2.5x or 3x mark up put in 250 or 300 respectively and your prices will show up as wholesale x your desired markup. This step is crucial so that the retail price is imported into the price field so your customers are not able to buy the item at a wholesale cost. You can make any price adjustments you would like after they are imported.

13. Click the blue Connect button.

14. After clicking the "Connect" button your pending connection will show up under Subscribed Connections as "Pending Parent Acceptance".
Please allow up to 2 business days for the sync to be approved.
Once your connection is approved, products will start to sync over into your Shopify system. This can take anywhere from 1-24 hours to complete depending on how many jobs Synclogic has in the queue to sync.
Inventory levels in your Shopify system will correspond to our inventory levels. When you make a sale it will NOT be held for you. After your order is placed an invoice will be sent to pay for your order. After it is paid the item will ship direct to your customer.